Dolphin Conning Tower: Difference between revisions
Pbcjohnston (talk | contribs) Created and formatted conning tower page |
Pbcjohnston (talk | contribs) Added first photo |
||
| Line 2: | Line 2: | ||
=== <big>Conning Tower</big> === | === <big>Conning Tower</big> === | ||
[[File]] | [[File:Dolphin Con Twr-1.jpg|left|500px]] | ||
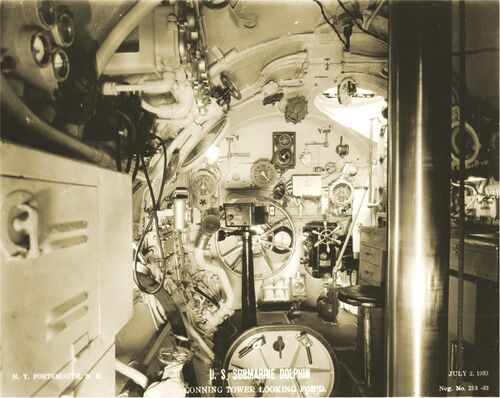
<div style="text-align: justify;"><span style="color:#00008B"> | <div style="text-align: justify;"><span style="color:#00008B">The conning tower looking forward. The conning tower was a separate, horizontal watertight compartment situated above the control room. It contained one of the boat's periscope stations, a helm wheel, a navigation chart table, and torpedo firing controls. On the right is the #1 periscope. Just to the left of that at the top is the bridge access trunk. You can see daylight coming down the hatch. | ||
In the center bottom is the access hatch from the control room. Directly above that on the forward bulkhead is the helm. | |||
Between the hatch and the helm there appears to be a pedestal, painted black, with a square top on it. Its function is not known for sure. It is suspected to have been placed there for temporary storage during the upkeep. It was perhaps moved from the deck or bridge. Historian Jim Christley has theorized that this could be an early version of a Sperry Mark I Target Bearing Transmitter (TBT) that was mounted on the bridge. A TBT is used to aim torpedoes while the boat is surfaced. It is used in conjunction with a pair of 7x50 binoculars. | |||
<small>US Navy Photo Contributed by Roger Torgeson</small> | |||
[[File:Red bar sub new 2.jpg]] | |||
<center>[[Dolphin Control Room and Pump Room|Control Room, Pump Room, & Cold Storage Room]] | [[Dolphin After Battery|After Battery/Crew's Berthing & Messing]] </center> | |||
[[File:Red bar sub new 2.jpg]] | [[File:Red bar sub new 2.jpg]] | ||
<center> | <center> | ||
Revision as of 20:57, 15 June 2023
Conning Tower

In the center bottom is the access hatch from the control room. Directly above that on the forward bulkhead is the helm.
Between the hatch and the helm there appears to be a pedestal, painted black, with a square top on it. Its function is not known for sure. It is suspected to have been placed there for temporary storage during the upkeep. It was perhaps moved from the deck or bridge. Historian Jim Christley has theorized that this could be an early version of a Sperry Mark I Target Bearing Transmitter (TBT) that was mounted on the bridge. A TBT is used to aim torpedoes while the boat is surfaced. It is used in conjunction with a pair of 7x50 binoculars.
US Navy Photo Contributed by Roger Torgeson
Page created by:
Ric Hedman & David Johnston
1999 - 2023 - PigBoats.COM©
Mountlake Terrace, WA, Norfolk, VA
webmaster at pigboats dot com
