T-3 interior photos
Torpedo Room

Ther are no torpedoes in this photo since the T-3 was brought back into commission strictly to test the German M.A.N. diesels with no intention for it to return as a fighting vessel. The space is being utilized for berthing and all the equipment for storing torpedoes has been removed.
The large black object in the overhead of the room is the motor for running the anchor and deck capstan. On the left in the photo, above the bunks is a valve manifold that is believed to be the forward fuel filling and transfer manifold. At the very top of the photo, above the light, is the transfer box for the control rod for the bow planes. At this point the mechanical torque from the rod is turned 90 degrees and exits the pressure hull through bushings and a gland seal. Stuffed in the overhead behind pipes and wires are life jackets.
Forward of the bunks on the right side of the photo is a desk with a typewriter on it. It was first thought this was used for radio equipment but after examining the photo of the radio space that opinion has been discarded. It could have been used for maintaining ships records by the ships clerk or Yeoman, or maybe have been installed for use during the trials. A portable electric space heater seen on the deck by the table leg and bottom torpedo tube door.
Photo courtesy of Sean Hert via Mike Mohl and Navsource.org.

The large valves and piping seen on the right, forward of the desk, are supposed to be part of the Trim and Drain system used for moving trimming water, (read weight), from and to the forward trim tank or to other tanks or from or to sea from the submarine. This system also combined the ability to pump the bilges.
The torpedo tubes are numbered, top to bottom and right to left. Looking at the photo the top tube on the right is number 1. The top tube on the left is number 2. The bottom tube on the right is number 3 and the bottom left is number 4. This numbering system is still in use today.
Above the top tier of tube doors are seen the manual tube firing levers. One each for each tube and be seen at the 10 o'clock and 2 o'clock positions above each door. The round valve handles above the doors separate the manual firing levers. The handles point up. When the command to fire is given the valve is pulled. If the electrical firing control in the control room fails, the manual lever will actuate the impulse air to the tube and eject the torpedo.
Between the tubes is a small arc shaped plate and just below these is a stub end for a handle. A large lever is placed over this and turned to open and close the outer torpedo tube shutter doors used to fair the tube openings with the hull and protect the outer doors from damage.
Photo courtesy of Sean Hert via Mike Mohl and Navsource.org.
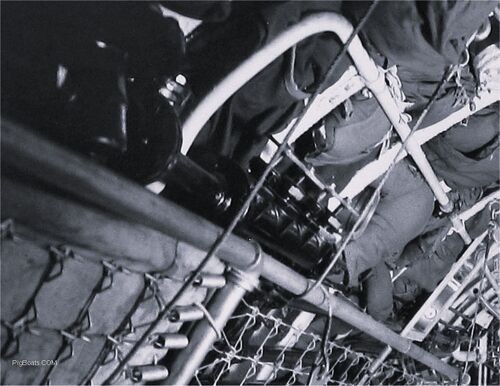
Photo courtesy of Sean Hert via Mike Mohl and Navsource.org.
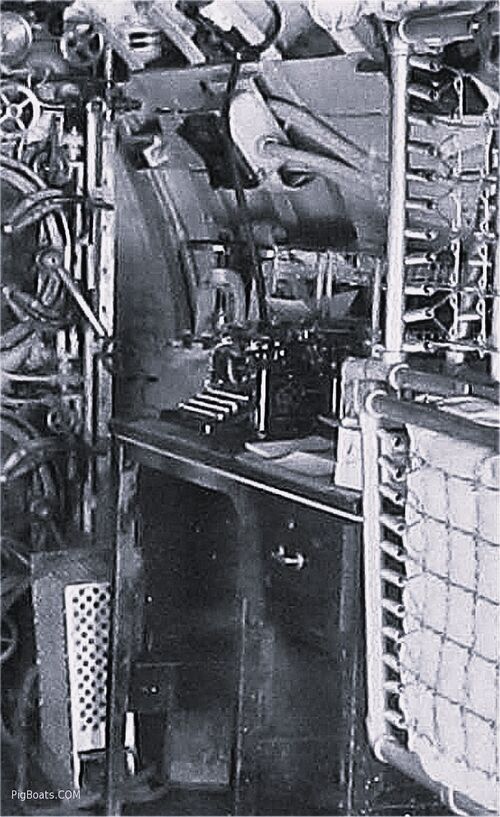
Photo courtesy of Sean Hert via Mike Mohl and Navsource.org.
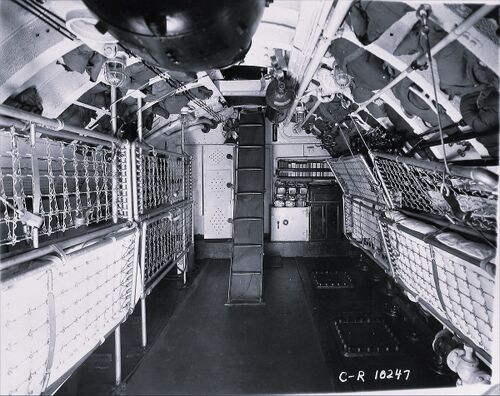
The large black object in the overhead is the capstan motor. Just to the right of the ladder in the overhead is an oxygen flask. Just to the right of that is the end of the bow planes control rod. Life jackets are stuffed into available spaces throughout the overhead.
Behind and above the tipped up bunks on the right is the forward fuel filling manifold.
At the far end of the compartment is a desk area. A reference library and the ship's safe. Stacked on top of the safe are containers of soda lime that in time of need can be open and spread on bunks or the deck to absorb CO2 from the atmosphere. Barely seen on the deck behind the bunks on the left side is another portable electric space heater. There is a non-watertight door behind the ladder that leads to the officer's berthing and wardroom.
Photo courtesy of Sean Hert via Mike Mohl and Navsource.org.
Radio Room
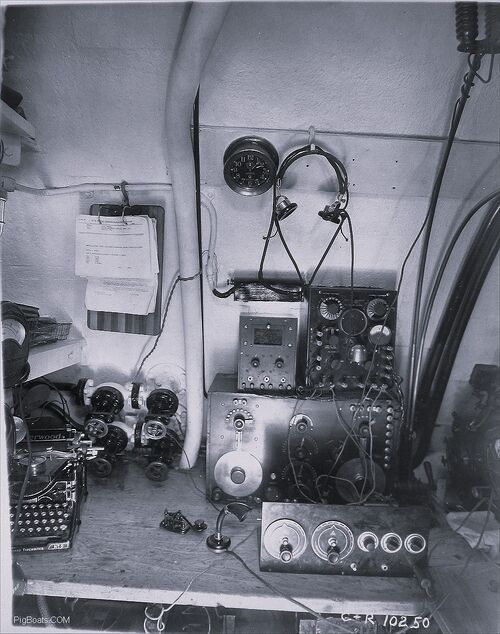
Photo courtesy of Sean Hert via Mike Mohl and Navsource.org.
Wardroom and Officer's Berthing

This view is looking forward. Over the door to the torpedo room proper is a depth gauge. It only measures to 100 feet though the actual test depth of the T-class was 150 feet. Folding camp chairs were used for general seating and for eating at the wardroom table. Ashtrays, a.k.a. "butt kits", are placed down the center of the table since smoking very common in this time period.
The table itself is covered by a heavy tablecloth, most probably dark green in color as that is a traditional color for this cloth in the U.S. Navy. The cloth has a fancy trim around the edge, possibly gold in color. Hanging in the overhead is an electrical cord with a socket fitting, probably for a clothing iron to press clothing, using the wardroom table as the ironing surface.
The dark rod seen in the overhead to left is a curtain rod to block off the berths from the rest of the space. The rings for hanging this curtain can be seen at the far end of the rod. Next to it is the drive shaft for the bow planes.
We are speculating that the two hydraulic motors in the overhead are used to lift spare torpedo bodies and warheads stored under the wardroom decks.
Photo courtesy of Sean Hert via Mike Mohl and Navsource.org.
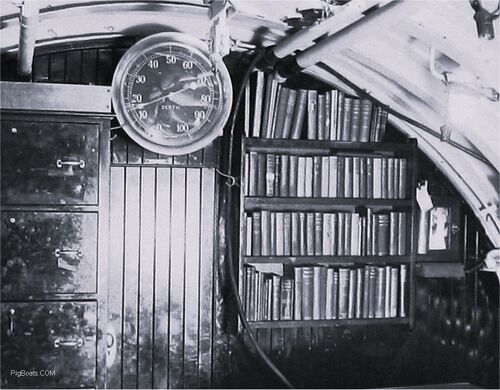
Books in the ships library used for reference are stored in the wardroom. Next to the depth gauge a large power cord can be seen draped over several pipes. This is for one of the numerous portable space heaters. The heater is hidden by the table. A reading lamp can be seen to the right of the bookcase.
Photo courtesy of Sean Hert via Mike Mohl and Navsource.org.

On either side of this door are, to the right, an area for hanging uniforms. In the earlier T-class these were separate lockers and on the opposite side of the door. To the left of the watertight door is a door that leads to the officer's head.
To the left of the door are a number of items. A large pipe running over the door and down the left side to a bell is a speaking tube. The bell is to let the wardroom know someone wants to talk. Below the bell are the compartment light switches. Below these, close to the bottom of the door is a dogging wrench used to tighten the dogs on the watertight door as tight as possible.
To the left of these is a bit of 1920's art or maybe "cheesecake". Above is a Chelsea clock, the time is 2:35, (probably PM). The power cord for a portable space heater is seen next to the left. The heater is seen at the end of the table.
The door to the officer's head is next. A large varnished mahogany closet is at the left.
Photo courtesy of Sean Hert via Mike Mohl and Navsource.org.
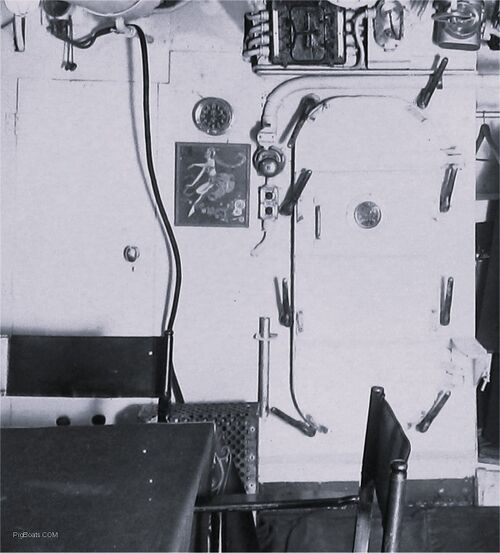
Photo courtesy of Sean Hert via Mike Mohl and Navsource.org.

Photo courtesy of Sean Hert via Mike Mohl and Navsource.org.
Battery Compartment and Crew's Berthing
Page created by:
Ric Hedman & David Johnston
1999 - 2023 - PigBoats.COM©
Mountlake Terrace, WA, Norfolk, VA
webmaster at pigboats dot com
