F-4 salvage: Difference between revisions
Pbcjohnston (talk | contribs) mNo edit summary |
Pbcjohnston (talk | contribs) (Added captions) |
||
| Line 170: | Line 170: | ||
[[File:F-4 salvage dd 1.jpg|left|500px]] | [[File:F-4 salvage dd 1.jpg|left|500px]] | ||
<div style="text-align: justify;"><span style="color:#00008B">Without a drydock of their own (the Pearl Harbor facilities were far from finished), the Navy was forced to contract with the Inter Island Company for use of their drydock. F-4 is shown here in the dock on August 31, 1915. A crowd of men has gathered to examine the remains of the boat. This view is looking at the nearly upside down F-4's bow, with pontoons on each side. Behind is the Hilo based tug Printer that had reserved dry dock time to repair her hull after a collision with one of her scows that was used to haul rock for the Hilo Harbor Breakwater. | |||
<small>Newspaper photo.</small> | |||
[[File:Red bar sub new.jpg]] | |||
[[File:F-4 salvage dd 2.jpg|left|500px]] | [[File:F-4 salvage dd 2.jpg|left|500px]] | ||
<div style="text-align: justify;"><span style="color:#00008B">This photo was taken shortly after the one above, from a higher angle. The inspection and remains recovery process has just begun. | |||
<small>Photo in the private collection of Ric Hedman.</small> | |||
[[File:Red bar sub new.jpg]] | |||
[[File:F-4 salvage dd 3.jpg|left|500px]] | [[File:F-4 salvage dd 3.jpg|left|500px]] | ||
<div style="text-align: justify;"><span style="color:#00008B">A broad angle view of the entire drydock. The Inter Island Drydock was a floating drydock, meaning that it partially submerged to allow vessels to float over it. Ballast tanks in either side of the dock would then be pumped out, raising the dock and its vessels. | |||
<small>Photo in the private collection of Ric Hedman.</small> | |||
[[File:Red bar sub new.jpg]] | |||
[[File:F-4 salvage dd 4.jpg|left|500px]] | [[File:F-4 salvage dd 4.jpg|left|500px]] | ||
<div style="text-align: justify;"><span style="color:#00008B">Once the dock was fully out of the water, the full extent of the damage to the F-4 was visible for the first time. The implosion in the started in the overhead of the torpedo room, nearing the torpedo loading hatch. It was a natural weak point in the structure where two hull plates were riveted together. The hull collapsed inward, nearly 150 psi knocking a huge hole in the pressure hull. Further collapse was stopped by the nearly instantaneous flooding of the rest of the boat. | |||
In this view the boat is upside down, with the port side facing up, looking at the bow. The strake like object at the top is the port side bilge keel, with the main keel just to the right of that. It is important to understand that the leaking battery acid did not cause the implosion. The battery acid weakened the bottom of the hull structure, causing a leak which made the boat heavy, quickly resulting in a loss of control. It was when the boat exceeded crush depth that the hull imploded. | |||
Admiral Clifford J. Boush, Commandant of the 14th Naval District in Hawaii, is seen in the foreground, wearing the long white coat. | |||
<small>Photo in the private collection of Ric Hedman.</small> | |||
[[File:Red bar sub new.jpg]] | |||
[[File:F-4 salvage dd 5.jpg|left|500px]] | [[File:F-4 salvage dd 5.jpg|left|500px]] | ||
[[File:F-4 salvage dd 6.jpg| | <div style="text-align: justify;"><span style="color:#00008B">Once all the excitement died down the Navy let several Photographers in to record the damages. The man at the right looks to be operating a movie camera. | ||
[[File: | <small>Photo in the private collection of Ric Hedman.</small> | ||
[[File:Red bar sub new.jpg]] | |||
<center> | |||
<gallery mode="packed" widths="400px" heights="300px"> | |||
File:F-4 salvage dd 6.jpg|<small>Photo in the private collection of Ric Hedman.</small> | |||
File:F-4 salvage dd 7.jpg|<small>Photo courtesy of Mike Dilley, whose father, Homer 'Pat' Dilley, sailed aboard the USS F-2.</small> | |||
</gallery> | |||
</center> | |||
<div style="text-align: justify;"><span style="color:#00008B">Two more views of the F-4 in drydock, from different angles. The men standing near the implosion hole give scale to the size of the hole. | |||
[[File:Red bar sub new.jpg]] | |||
[[File:F-4 salvage dd 9.jpg|left|500px]] | [[File:F-4 salvage dd 9.jpg|left|500px]] | ||
<div style="text-align: justify;"><span style="color:#00008B">A view from aft, showing damage to the rudder, stern planes, and propellers. The stern planes and rudders have been torn away during the salvage effort. The ram for the planes and rudders can be seen under the right-hand propeller. The skeg for holding the lower rudder is twisted almost 90 degrees to port. | |||
These newly installed experimental propellers were of a special design that were intended for low RPM and high efficiency. It is thought that at high speeds they would have done little to drive the submarine to the surface. The official report stated that these propellers ''"were the secondary cause of the disaster"'' by providing insufficient water flow over the stern planes and thus negatively impacting the control of the vessel. | |||
<small>Photo in the private collection of Ric Hedman.</small> | |||
[[File:Red bar sub new.jpg]] | |||
[[File:F-4 salvage dd 10.jpg|left|500px]] | [[File:F-4 salvage dd 10.jpg|left|500px]] | ||
<div style="text-align: justify;"><span style="color:#00008B">A sailor, who appears to be a second class petty officer, stands alongside the F-4. He has a pretty grim look on his face. Could be a sailor from one of the other F-class submarines. | |||
The extensive damage to the after end of the submarine is very evident. Remembering that the submarine is almost upside down, the twisted piece of metal to the left and twisted towards the camera is actually part of the upper skeg running from the deck to the rudder. It has been bent over more than 90 degrees. The blades of the screws have been bent over and a huge chip has been made in the blade of the screw. | |||
<small>Photo in the private collection of Ric Hedman.</small> | |||
[[File:Red bar sub new.jpg]] | |||
[[File:F-4 salvage dd 8.jpg|left|500px]] | |||
<div style="text-align: justify;"><span style="color:#00008B">In a photo taken several days later, if you look closely you can see that the bent propellers have been removed from the stern. A large hull plate has been removed from the engine room area to facilitate the removal of the bodies of the crew. Most of the crew took refuge there as fumes and water filled the rest of the boat, but quickly died when the watertight door failed under pressure. There is also a smaller hole on the bottom (top) of the submarine, perhaps to pump fuel out of tanks. | |||
<small>Photo in the private collection of Ric Hedman.</small> | |||
[[File:Red bar sub new.jpg]] | |||
[[File:F-4 salvage exhaust.jpg|left|500px]] | [[File:F-4 salvage exhaust.jpg|left|500px]] | ||
<div style="text-align: justify;"><span style="color:#00008B">What remains of the port engine exhaust system, exposed after the superstructure was ripped away by the salvage efforts. | |||
<small>Photo in the private collection of Ric Hedman.</small> | |||
[[File:Red bar sub new.jpg]] | |||
[[File:F-4 salvage dd 11.jpg|left|500px]] | [[File:F-4 salvage dd 11.jpg|left|500px]] | ||
<div style="text-align: justify;"><span style="color:#00008B">A close up of the implosion damage to the F-4's hull. It looks like crumpled tin foil, such was the force of the implosion. Note the frayed mass of hemp mooring lines still in their below deck locker, stowed there on the morning March 25, 1915 when the boat got underway for its final voyage. | |||
<small>Photo in the private collection of Ric Hedman.</small> | |||
[[File:Red bar sub new.jpg]] | |||
[[File:F-4 salvage dd 12.jpg|left|500px]] | [[File:F-4 salvage dd 12.jpg|left|500px]] | ||
<div style="text-align: justify;"><span style="color:#00008B">A very rare photo taken of the forlorn F-4 in drydock. The photo was likely taken by an unauthorized civilian, as there is a note on the back indicating that he nearly got his camera smashed by a guard and that he was quickly run off the premises. | |||
This photo shows the F-4 with her bow cap rotated to line up with two of her four torpedo tubes. This was done so that the weapons in the tubes could be removed. To access the other two tubes the cap was rotated to the right. To completely close all four tubes the cap was rotated so that the openings were vertical and behind the stem. | |||
<small>Photo in the private collection of Ric Hedman.</small> | |||
[[File:Red bar sub new.jpg]] | [[File:Red bar sub new.jpg]] | ||
<div style="text-align: justify;"><span style="color:#000000"> | |||
=== <big>Post Salvage</big> === | === <big>Post Salvage</big> === | ||
</div> | |||
[[File:F-4 hoggett.jpg|left|500px]] | [[File:F-4 hoggett.jpg|left|500px]] | ||
Revision as of 18:18, 8 September 2023

Search for the Lost Boat

Here two men are using a box with a glass plate in the bottom that allowed a clearer view of things underwater.
Photo in the private collection of Ric Hedman.
![]()

According to the Board of Investigation Report, when the weight of the anchor was discovered Jack Agraz, Chief Gunners Mate, a Navy diver from the USS F-1, donned his gear and followed the line to the target. Three crews of four men each manned the hand turned air pump suppling air to him. He discovered the grapple chain was wrapped around "an old anchor" at 215 feet. The F-4 had not been found.
Photo in the private collection of Ric Hedman.
![]()

Photo in the private collection of Ric Hedman.
![]()

Photo in the private collection of Ric Hedman.
![]()

Photo in the private collection of Ric Hedman.
![]()

Photo in the private collection of Ric Hedman.
![]()

Photo in the private collection of Ric Hedman.
![]()
Salvage Work

Photo in the private collection of Ric Hedman.
![]()

Photo in the private collection of Ric Hedman.
![]()

Photo in the private collection of Ric Hedman.
![]()

Photo in the private collection of Ric Hedman.
![]()

The rope that is being worked on by the men on deck can be seen floating in the water in front of the submarine. There is a similar one stretching from the after deck to what is assumed to be the salvage barge. The F-2 is probably in the process of mooring to that barge to supply the air needed for the pontoons.
Note the proximity to the shore. The F-4 sank just outside of the entrance to Honolulu Harbor, in Mamala Bay. With Oahu essentially being the top of an underwater mountain, the water depth drops off precipitously as soon as you leave the harbor.
Photo in the private collection of Ric Hedman.
![]()

Photo in the private collection of Ric Hedman.
![]()
Raising the Boat with Pontoons


Photos in the private collection of Ric Hedman.
![]()

In the center background is the Navy floating cantilever pontoon crane YD-25. The crane had a lifting rating of 150 tons. Too little to have lifted the flooded F-4. She was destined to become a visual fixture at Pearl Harbor for the next dozen years.
In the left background the USS Maryland is moored. She is the vessel that brought the six lifting pontoons to Hawaii.
Newspaper photo.
![]()

Photo in the private collection of Ric Hedman.
![]()

Photo from Beneath the Surface: WWI Submarines Built in Seattle and Vancouver by Bill LIghtfoot.
![]()


Photos in the private collection of Ric Hedman.
![]()
In Drydock

Newspaper photo.
![]()

Photo in the private collection of Ric Hedman.
![]()

Photo in the private collection of Ric Hedman.
![]()

In this view the boat is upside down, with the port side facing up, looking at the bow. The strake like object at the top is the port side bilge keel, with the main keel just to the right of that. It is important to understand that the leaking battery acid did not cause the implosion. The battery acid weakened the bottom of the hull structure, causing a leak which made the boat heavy, quickly resulting in a loss of control. It was when the boat exceeded crush depth that the hull imploded.
Admiral Clifford J. Boush, Commandant of the 14th Naval District in Hawaii, is seen in the foreground, wearing the long white coat.
Photo in the private collection of Ric Hedman.
![]()

Photo in the private collection of Ric Hedman.
![]()
-
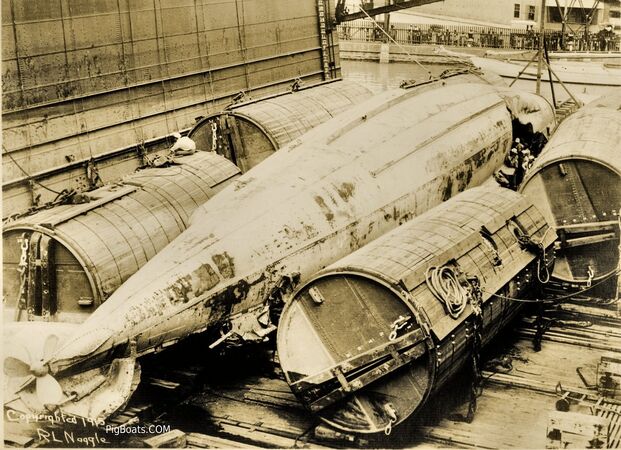
Photo in the private collection of Ric Hedman.
-
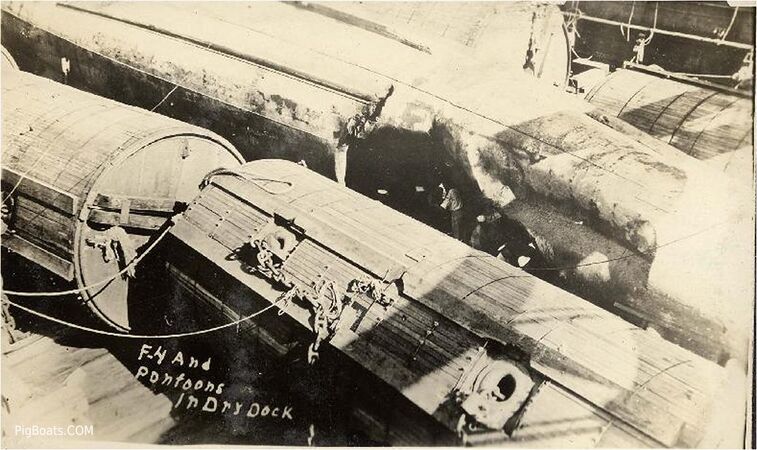
Photo courtesy of Mike Dilley, whose father, Homer 'Pat' Dilley, sailed aboard the USS F-2.


![]()

These newly installed experimental propellers were of a special design that were intended for low RPM and high efficiency. It is thought that at high speeds they would have done little to drive the submarine to the surface. The official report stated that these propellers "were the secondary cause of the disaster" by providing insufficient water flow over the stern planes and thus negatively impacting the control of the vessel.
Photo in the private collection of Ric Hedman.
![]()

The extensive damage to the after end of the submarine is very evident. Remembering that the submarine is almost upside down, the twisted piece of metal to the left and twisted towards the camera is actually part of the upper skeg running from the deck to the rudder. It has been bent over more than 90 degrees. The blades of the screws have been bent over and a huge chip has been made in the blade of the screw.
Photo in the private collection of Ric Hedman.
![]()

Photo in the private collection of Ric Hedman.
![]()

Photo in the private collection of Ric Hedman.
![]()

Photo in the private collection of Ric Hedman.
![]()

This photo shows the F-4 with her bow cap rotated to line up with two of her four torpedo tubes. This was done so that the weapons in the tubes could be removed. To access the other two tubes the cap was rotated to the right. To completely close all four tubes the cap was rotated so that the openings were vertical and behind the stem.
Photo in the private collection of Ric Hedman.
![]()
Post Salvage


![]()


![]()


![]()
F-4 Legacy


![]()
Page created by:
Ric Hedman & David Johnston
1999 - 2023 - PigBoats.COM©
Mountlake Terrace, WA, Norfolk, VA
webmaster at pigboats dot com
![]()